
Linto George
Posted on Jan 27
Autoscaling means
Autoscaling is a technique that dynamically adjusts the number of computing resources allocated to your application based on its real-time demands. For instance, if your website experiences a spike in traffic at the end of every month, you may require additional web servers to manage the increased load. However, during the rest of the month, those servers remain underutilized, leading to higher cloud costs. By enabling autoscaling, the number of servers can scale up or down automatically based on the workload and user demand, optimizing both performance and cost.
In the Kubernetes era, autoscaling has become a critical component in ensuring the scalability of containerized applications. This article explores the various types of autoscalers available in Kubernetes and helps identify the most suitable autoscaler for your application needs.
There are three ways to achieve high availability in Kubernetes
- Horizontal Pod autoscaling (HPA)
- Vertical Pod Autoscaling (VPA)
- Cluster autoscaler
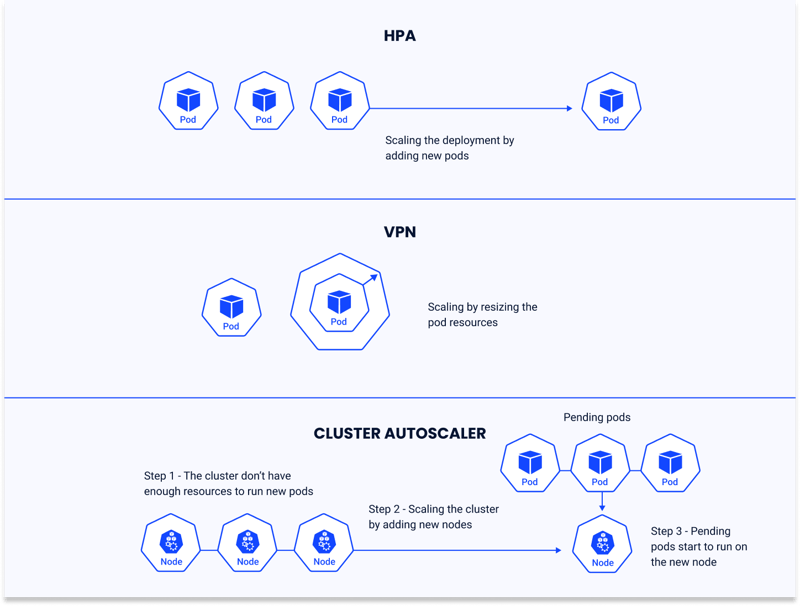
In a nutshell autoscaling include activity’s like :
- Adjust the number of POD : Increase or decrease the pod replicas based on the metrics (HPA)
- Adjust the resource in the POD : Increase or decrease the resource allocated to the pod(increase CPU /memory allocation) (VPA)
- Adjust the node in the cluster : Increase the number of nodes(VM) which increase overall resource allocated to the cluster (Cluster Autoscaling)
These feature make sure an application can scale up/scale down by its own base on the condition we set, normally CPU/Memory utilization, traffic to POD etc, we can also define custom parameters based on the metrics.
Horizontal Pod Autoscaler (HPA)
HPA is a Kubernetes feature that automatically adjusts the number of pods in a replication controller, deployment, replica set, or stateful set based on resource metrics. By default, it monitors CPU utilization, but with support for custom metrics, it can scale pods based on other application-defined metrics as well.
Setting up HPA is a simple process. It involves specifying the metrics to track, the target value for each metric, and the minimum and maximum number of pods. The HPA controller continuously monitors the defined metrics and adjusts the number of replicas to ensure the observed average resource usage aligns with the user-defined target.
How HPA Works
The HPA controller periodically checks the specified metrics, such as:
- CPU Utilization: By default, HPA monitors CPU usage to determine scaling needs.
- Memory Utilization: Memory-based scaling can also be configured.
- Custom Metrics: With custom metrics support, HPA can scale based on application-specific metrics, such as request latency, queue length, or active users.
Based on the observed metrics and the user-defined targets, HPA adjusts the number of replicas in real-time to maintain the desired resource utilization levels.
Key Components of HPA
- Metrics Server: The HPA relies on the Metrics Server to fetch resource usage data like CPU or memory utilization.
- Target Utilization: You define the target utilization (e.g., 80% CPU usage) that HPA tries to maintain.
- Scaling Constraints: HPA allows you to set a minimum and maximum number of replicas to prevent over-scaling or under-scaling.
Configuring HPA
Implementing HPA requires a few steps:
- Define the metrics to monitor (e.g., CPU or custom metrics).
- Set the target value for the metric (e.g., 70% average CPU usage).
- Specify the minimum and maximum number of replicas in the HPA configuration.
Here’s an example YAML configuration for an HPA based on CPU utilization:
Prerequisites: Metrics Server must be enabled/installed in your cluster.
Usecase 1: creating a HPA deployment file
apiVersion: autoscaling/v2
kind: HorizontalPodAutoscaler
metadata:
name: my-hpa
spec:
scaleTargetRef:
apiVersion: apps/v1
kind: Deployment
name: my-app
minReplicas: 2
maxReplicas: 5
metrics:
- type: Resource
resource:
name: cpu
target:
type: Utilization
averageUtilization: 70 //Target 70% CPU utilization
Save it and apply it using “kubectl apply -f my-hpa.yaml”
The HPA will monitor CPU usage and scale Pods dynamically between the defined minReplicas and maxReplicas
For POD deployment, You can use below deployment file my-app.yaml
Usecase 2: Creating an deployment file and use “autoscale” command (declarative)
apiVersion: apps/v1
kind: Deployment
metadata:
name: my-app
labels:
app: my-app
spec:
replicas: 3 # Desired number of replicas
selector:
matchLabels:
app: my-app
template:
metadata:
labels:
app: my-app
spec:
containers:
- name: my-app
image: nginx:latest
ports:
- containerPort: 80
save this file as my-app.yaml and apply it using “kubectl apply -f my-app.yaml”
kubectl autoscale deployment my-app --cpu-percent=50 --min=1 --max=5
kubectl get hpa
Increase the load : Run this in a separate terminal, so that the load generation continues and you can carry on with the rest of the steps
kubectl run -i --tty load-generator --rm --image=busybox:1.28 --restart=Never -- /bin/sh -c "while sleep 0.01; do wget -q -O- http://php-apache; done"
//Automatic load generator
kubectl get hpa my-hpa --watch
kubectl get deployment my-app
Once the load increased and CPU utilization>50m then you can see and a new replica of my-app POD is created to serve the load.
Vertical Pod Autoscaler (VPA) in Kubernetes
The Vertical Pod Autoscaler (VPA) is a Kubernetes feature that optimizes resource usage by automatically adjusting the CPU and memory requests and limits of pods in a deployment, replica set, or stateful set. Unlike the Horizontal Pod Autoscaler (HPA), which scales the number of pods, the VPA focuses on resizing the resource allocations for individual pods to better match their actual usage.
How VPA Works
Resource Monitoring: The VPA continuously monitors resource usage (CPU and memory) of pods over time.
Recommendation Engine: Based on the observed usage patterns, it provides recommendations for optimal CPU and memory requests/limits.
Automatic Adjustments: If configured in “auto” mode, the VPA can directly apply the recommended resource values to the pods.
When VPA adjusts resources, the affected pods are restarted to apply the new resource settings, ensuring the changes take effect.
Key Components of VPA
- VPA Admission Plugin: Ensures new pods in a deployment are created with the recommended resource requests and limits.
- VPA Recommender: Continuously calculates resource recommendations based on pod usage metrics.
- VPA Updater: (Optional) Evicts pods to apply the recommended resource changes automatically.
Configuring VPA
To set up VPA, you define a VerticalPodAutoscaler resource. Here’s an example YAML configuration
apiVersion: autoscaling.k8s.io/v1
kind: VerticalPodAutoscaler
metadata:
name: my-app-vpa
spec:
targetRef:
apiVersion: apps/v1
kind: Deployment
name: my-app
updatePolicy:
updateMode: "Auto" # Modes: Auto, Recreate, or Off
Update Modes:
Off: Only provides resource recommendations without making changes.
Recreate: Evicts and recreates pods to apply updated resource requests/limits.
Auto: Automatically adjusts resource settings for running pods by evicting and restarting them
Difference Between HPA and VPA
- HPA will be Ideal for handling fluctuating workloads where traffic or demand increases and decreases dynamically. Eg: Scaling the number of replicas for a web server during peak traffic.
- VPA will best for optimizing resource utilization of individual pods to prevent over/under-provisioning. Eg, Adjusting CPU and memory for a data-processing pod that has variable resource needs.
- HPA scales the number of replicas where VPA scale resource request/limit of individual POD (CPU/Memory)
- HPA adds/remove pods to handle workload changes, where VPA restarts pods to apply new resource request/limits
- HPA use CPU/Memory and custom metrics (via metrics server/prometheus) where VPA use CPU and memory metrics
- HPA Increases application availability and resilience by scaling out pods. VPA Optimizes resource utilization and reduces over-provisioning costs.
Cluster Autoscaler in Kubernetes
The Cluster Autoscaler is a Kubernetes component that dynamically adjusts the size of a cluster by adding or removing nodes to match the resource demands of your workloads. It ensures that your cluster has the right amount of compute capacity to handle varying workloads while optimizing resource utilization and minimizing costs.
How Cluster Autoscaler Works
Scaling Up: When pods cannot be scheduled due to insufficient resources (e.g., CPU, memory), the Cluster Autoscaler identifies the resource gap and provisions additional nodes to accommodate the pending pods.
Scaling Down: When nodes are underutilized (i.e., no running pods or pods can fit on other nodes), the Cluster Autoscaler terminates those nodes to save costs, provided their pods can be rescheduled elsewhere.
Node Pools Integration: The Cluster Autoscaler interacts with the underlying cloud provider (e.g., AWS, Azure, GCP) to dynamically scale the node pools by adding or removing virtual machines.
Key Features of Cluster Autoscaler
- Pod Affinity/Anti-Affinity Awareness: Ensures scaling decisions respect pod placement rules.
- Node Taints and Tolerations: Only schedules workloads on nodes with matching taints and tolerations.
- Custom Resource Requests: Handles workloads requiring GPUs or other custom resources.
- Priority Scaling: Supports scaling based on pod priorities, ensuring high-priority pods are scheduled first.
- Scale Down Safeguards: Protects nodes with critical system pods or local storage.
Configuring Cluster Autoscaler
Cluster Autoscaler can be configured by deploying it as a pod in your cluster. Below is an example configuration for a cluster running on a cloud provider (e.g., AWS, GCP, or Azure):
//used AWS Cloud provider in below example
apiVersion: apps/v1
kind: Deployment
metadata:
name: cluster-autoscaler
namespace: kube-system
spec:
replicas: 1
selector:
matchLabels:
app: cluster-autoscaler
template:
metadata:
labels:
app: cluster-autoscaler
spec:
containers:
- image: k8s.gcr.io/autoscaling/cluster-autoscaler:v1.26.0
name: cluster-autoscaler
command:
- ./cluster-autoscaler
- --cloud-provider=aws
- --nodes=1:10:my-node-group
- --balance-similar-node-groups
- --skip-nodes-with-system-pods=true
- --skip-nodes-with-local-storage=false
env:
- name: AWS_REGION
value: us-west-2
serviceAccountName: cluster-autoscaler
tolerations:
- key: "CriticalAddonsOnly"
operator: "Exists"
- key: "node-role.kubernetes.io/master"
operator: "Exists"
When to Use Cluster Autoscaler
- Dynamic Workloads: Workloads with fluctuating resource demands, such as batch jobs or event-driven applications.
- Cost-Saving Initiatives: Minimizes costs by scaling down unused nodes during low-traffic periods.
- Avoiding Resource Bottlenecks: Ensures workloads are not starved of resources during traffic spikes or high-demand scenarios.
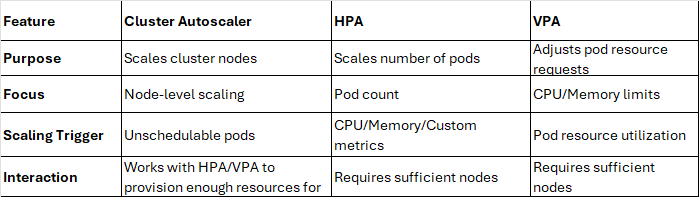
Compare Cluster Autoscaler vs Horizontal/Vertical Pod Autoscaler
Reference :
- https://kubernetes.io/docs/tasks/run-application/horizontal-pod-autoscale/
- https://kubernetes.io/docs/tasks/run-application/horizontal-pod-autoscale-walkthrough/
- https://kubernetes.io/docs/concepts/workloads/autoscaling/
- https://kubernetes.io/docs/tasks/configure-pod-container/resize-container-resources/
- Chatgpt